You may notice something very unrealistic about the results of this tutorial. For example, take this image:
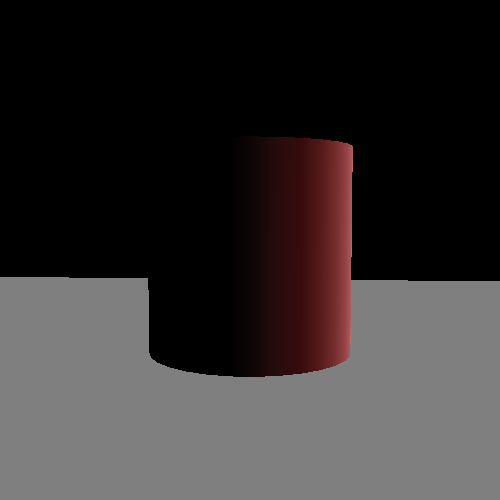
The unlit portions of the cylinder are completely, 100% black. This almost never happens in real life, even for objects we perceive as being “black” in color. The reason for this is somewhat complicated.
Consider a scene of the outdoors. In normal daylight, there is exactly one light source: the sun. Objects that are in direct sunlight appear to be bright, and objects that have some object between them and the sun are in shadow.
But think about what those shadows look like. They're not 100% black. They're certainly darker than the surrounding area, but they still have some color. And remember: we only see anything because our eyes detect light. In order to see an object in the shadow of a light source, that object must either be emitting light directly or reflecting light that came from somewhere else. Grass is not known for its light-emitting qualities, so where does the light come from?
Think about it. We see because an object reflects light into our eyes. But our eyes are not special; the object does not reflect light only into our eyes. It reflects light in all directions. Not necessarily at the same intensity in each direction, but objects that reflect light tend to do so in all directions to some degree. What happens when that light hits another surface?
The same thing that happens when light hits any surface: some of it is absorbed, and some is reflected in some way.
The light being cast in shadows from the sun comes from many places. Part of it is an atmospheric effect; the sun is so bright that the weakly reflective atmosphere reflects enough light to shine a color. Typically, this is a pale blue. Part of the light comes from other objects. The sun gives off so much light that the light reflected from other objects is bright enough to be a substantial contributer to the overall lighting in a scene.
This phenomenon is called interreflection. A lighting model that handles interreflection is said to handle global illumination. It represents light that bounces from object to object before hitting the eyes of the person viewing the scene. Modelling only lighting directly from a light-emitting surface is called local illumination or direct illumination, and it is what we have been doing up until this point.
As you might imagine, modelling global illumination is hard. Very hard. It is typically a subtle effect, but in many scenes, particularly outdoor scenes, it is almost a necessity to provide at least basic global illumination modelling in order to achieve a decent degree of photorealism. Incidentally, this is a good part of the reason why most games tend to avoid outdoor scenes or light outdoor scenes as though the sky were cloudy or overcast. This neatly avoids needing to do complex global illumination modelling by damping down the brightness of the sun to levels when interreflection would be difficult to notice.
Having this completely black area in our rendering looks incredibly fake. Since doing actual global illumination modelling is hard, we will instead use a time-tested technique: ambient lighting.
The ambient lighting “model”[6] is quite simple. It assumes that, on every object in the scene, there is a light of a certain intensity that emanates from everywhere. It comes from all directions equally, so there is no angle of incidence in our diffuse calculation. It is simply the ambient light intensity * the diffuse surface color.
We do this in the Ambient Lighting tutorial. The controls are the same as the last tutorial, except that the space bar swaps between the two cylinders (red and white), and that the T key toggles ambient lighting on and off (defaults to off).
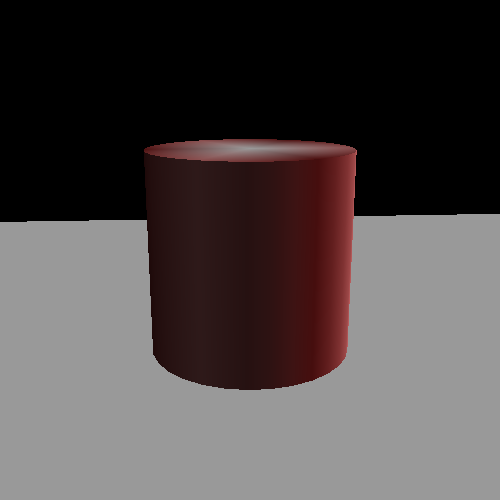
The detail seen in the dark portion of the cylinder only comes from the diffuse color. And because the ambient is fairly weak, the diffuse color of the surface appears muted in the dark areas.
The rendering code now uses four of vertex shaders instead of two. Two of them are used for non-ambient lighting, and use the same shaders we have seen before, and the other two use ambient lighting.
The ambient vertex shader that uses per-vertex colors is called
DirAmbVertexLighting_PCN.vert and reads as follows:
Example 9.6. Ambient Vertex Lighting
#version 330

layout(location = 0) in vec3 position;
layout(location = 1) in vec4 diffuseColor;
layout(location = 2) in vec3 normal;

smooth out vec4 interpColor;

uniform vec3 dirToLight;
uniform vec4 lightIntensity;
uniform vec4 ambientIntensity;

uniform mat4 modelToCameraMatrix;
uniform mat3 normalModelToCameraMatrix;

layout(std140) uniform Projection
{
    mat4 cameraToClipMatrix;
};

void main()
{
    gl_Position = cameraToClipMatrix * (modelToCameraMatrix * vec4(position, 1.0));

    vec3 normCamSpace = normalize(normalModelToCameraMatrix * normal);

    float cosAngIncidence = dot(normCamSpace, dirToLight);
    cosAngIncidence = clamp(cosAngIncidence, 0, 1);

    interpColor = (diffuseColor * lightIntensity * cosAngIncidence) +
        (diffuseColor * ambientIntensity);
}
It takes two uniforms that specify lighting intensity. One specifies the intensity for the diffuse lighting, and the other for the ambient lighting. The only other change is to the last line in the shader. The usual diffuse lighting result has its value added to the ambient lighting computation. Also, note that the contribution from two lighting models is added together.
Of particular note is the difference between the lighting intensities in the pure-diffuse case and the diffuse+ambient case:
Example 9.7. Lighting Intensity Settings
if(g_bShowAmbient)
{
    glUseProgram(whiteDiffuse.theProgram);
    glUniform4f(whiteDiffuse.lightIntensityUnif, 0.8f, 0.8f, 0.8f, 1.0f);
    glUniform4f(whiteDiffuse.ambientIntensityUnif, 0.2f, 0.2f, 0.2f, 1.0f);
    glUseProgram(vertexDiffuse.theProgram);
    glUniform4f(vertexDiffuse.lightIntensityUnif, 0.8f, 0.8f, 0.8f, 1.0f);
    glUniform4f(vertexDiffuse.ambientIntensityUnif, 0.2f, 0.2f, 0.2f, 1.0f);
}
else
{
    glUseProgram(whiteDiffuse.theProgram);
    glUniform4f(whiteDiffuse.lightIntensityUnif, 1.0f, 1.0f, 1.0f, 1.0f);
    glUseProgram(vertexDiffuse.theProgram);
    glUniform4f(vertexDiffuse.lightIntensityUnif, 1.0f, 1.0f, 1.0f, 1.0f);
}
In the pure-diffuse case, the light intensity is full white. But in the ambient case, we deliberately set the diffuse intensity to less than full white. This is very intensional.
We will talk more about this issue in the future, but it is very critical that light intensity values not exceed 1.0. This includes combined lighting intensity values. OpenGL clamps colors that it writes to the output image to the range [0, 1]. So any light intensity that exceeds 1.0, whether alone or combined with other lights, can cause unpleasant visual effects.
There are ways around this, and those ways will be discussed in the eventual future.
[6] I put the word model in quotations because ambient lighting is so divorced from anything in reality that it does not really deserve to be called a model. That being said, just because it does not actually model global illumination in any real way does not mean that it is not useful.